I have a 72 LEDs DIY Dimmable Kit with LEDs Color Option: 36 white 32 blue 2 red 2 UV and 5 420nm 3W True Violet LED . (yes, the math does not add up, there were extras ") ) I have the below image X2.
) I have the below image X2.
This is just my DIY, not a 'how to', please do not attempt unless you know what you are doing. I hold no liability if you attempt this at home. If you electrocute yourself and die, please do not sue me.
Source: Stock image www.aquastyleonline.com
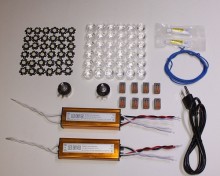
What actually came out of the box:
Fresh out of the box. Great packaging.

Everything out of the bubble wrap

Dimmers

Drivers

LEDs

LED close up (the goop is flux that I added for soldering)

There really is not a lot to write or show in this build as it is just connecting wires. I tinned all the contacts before I started the build.
It took about 1 hour for all 4 spots on the LEDs.

I have purchased U-Channel that I will be cut it to 32" to make my Heatsink. For the record, it would have been cheaper to buy what was needed from Aquastyleonline.ca as it cost me 45$ in Uchannel and it would have been 44$ more in my order including the shipping. But I like to build what I can. I also used 1/2 tube of heatsink adhesive to 'glue' the uchannel together in 4 spots on each channel. They sent 4 tubes, I still have 1 & 3/4 tubes left still. That is with leaving the adhesive oozing out from the LEDs. A dab will do you, did not get a pic of the backside of an LED before I mounted it. Just too excited I guess.

Hope the advertisement for the site is OK in this pic


Again, supper simple DIY. Just solder one - to the + of the next and voila, done! I tested all 3 strings one at a time with a driver and dimmer before jumping into the next part. This project was more then easy. (as long as you can solder)

My make shift controller for now. When I screwed in the drivers, I slid a 1/2" nut on the screw to raise the driver from the wood backing. I had no idea where the hot spots might be, so this would allow for ventilation. (turns out there were no heat issues, even when running at almost 100%)


White string lit up

Royal Blues lit up

UV/Red/420nm and a few extra RB to complete the min 10 suggested for the driver.

Finally, all lit up

I have not used any of the optics. May try to do every other LED with optic but it reaches the bottom of my 2' tank just fine even when running dimmed.
There have been no heat issues. No additional fans added to my tank and the LEDs are cool to the touch. Drivers as well are cool to the touch.
Tank pics to come tonight. Although what I have so far does not do it justice. Same as the video I took. I took a video of the drivers all turned down, then maximized each driver/string one at a time. Just plan does not catch what is really going on due to auto adjustments in the brightness. It is a MUST see for anyone. When I run only Royal Blue at 100% (everything else min dim setting) the corals glow like I have never seen before. The control is amazing and a MUST for any reefer!
Update: December 10, 2011
A: I cut off the section of coral with the colonial hydroids, lost a few zoas thoughoop:
B: Played with optics. My fixture is only about 2" above the water line. Optics looked horrible when place on every LED. The RB and Red where strong spotlights.
I ended up removing the optics from the blue and UV string, I left them on every other white which looks nice. There is no 'spot lighting' per say, it makes a nice shimmer across the rocks.
C: Now that I have dialed up my lights, they do run warm. I can still hold my finger on the back of the uchannel. It is warm, but not hot. I have added my 120mm cooling fan and just laid it on the channel. It is cool to the touch. Will try to get a thermometer and measure the differences.
) I have the below image X2.This is just my DIY, not a 'how to', please do not attempt unless you know what you are doing. I hold no liability if you attempt this at home. If you electrocute yourself and die, please do not sue me.
Source: Stock image www.aquastyleonline.com
What actually came out of the box:
Fresh out of the box. Great packaging.
Everything out of the bubble wrap
Dimmers
Drivers
LEDs
LED close up (the goop is flux that I added for soldering)
There really is not a lot to write or show in this build as it is just connecting wires. I tinned all the contacts before I started the build.
It took about 1 hour for all 4 spots on the LEDs.
I have purchased U-Channel that I will be cut it to 32" to make my Heatsink. For the record, it would have been cheaper to buy what was needed from Aquastyleonline.ca as it cost me 45$ in Uchannel and it would have been 44$ more in my order including the shipping. But I like to build what I can. I also used 1/2 tube of heatsink adhesive to 'glue' the uchannel together in 4 spots on each channel. They sent 4 tubes, I still have 1 & 3/4 tubes left still. That is with leaving the adhesive oozing out from the LEDs. A dab will do you, did not get a pic of the backside of an LED before I mounted it. Just too excited I guess.
Hope the advertisement for the site is OK in this pic
Again, supper simple DIY. Just solder one - to the + of the next and voila, done! I tested all 3 strings one at a time with a driver and dimmer before jumping into the next part. This project was more then easy. (as long as you can solder)
My make shift controller for now. When I screwed in the drivers, I slid a 1/2" nut on the screw to raise the driver from the wood backing. I had no idea where the hot spots might be, so this would allow for ventilation. (turns out there were no heat issues, even when running at almost 100%)
White string lit up
Royal Blues lit up
UV/Red/420nm and a few extra RB to complete the min 10 suggested for the driver.
Finally, all lit up
I have not used any of the optics. May try to do every other LED with optic but it reaches the bottom of my 2' tank just fine even when running dimmed.
There have been no heat issues. No additional fans added to my tank and the LEDs are cool to the touch. Drivers as well are cool to the touch.
Tank pics to come tonight. Although what I have so far does not do it justice. Same as the video I took. I took a video of the drivers all turned down, then maximized each driver/string one at a time. Just plan does not catch what is really going on due to auto adjustments in the brightness. It is a MUST see for anyone. When I run only Royal Blue at 100% (everything else min dim setting) the corals glow like I have never seen before. The control is amazing and a MUST for any reefer!
Update: December 10, 2011
A: I cut off the section of coral with the colonial hydroids, lost a few zoas though
oop:B: Played with optics. My fixture is only about 2" above the water line. Optics looked horrible when place on every LED. The RB and Red where strong spotlights.
I ended up removing the optics from the blue and UV string, I left them on every other white which looks nice. There is no 'spot lighting' per say, it makes a nice shimmer across the rocks.
C: Now that I have dialed up my lights, they do run warm. I can still hold my finger on the back of the uchannel. It is warm, but not hot. I have added my 120mm cooling fan and just laid it on the channel. It is cool to the touch. Will try to get a thermometer and measure the differences.


